Category Archives: Cable Management

Horizontal Cable Management VS Vertical Cable Management: Which to Choose?

Efficient cable management has been an indispensable aid for the cable organization, no matter it is vertical cable management or horizontal cable management. Owing to the more and more complicated network, a well-managed cabling has been a pressing job for most network installers and IT technicians. Therefore, a proper cable management means a lot to them. However, faced with two frequently used options, what on earth should they choose: vertical cable management or horizontal cable management

Vertical Cable Management Basics

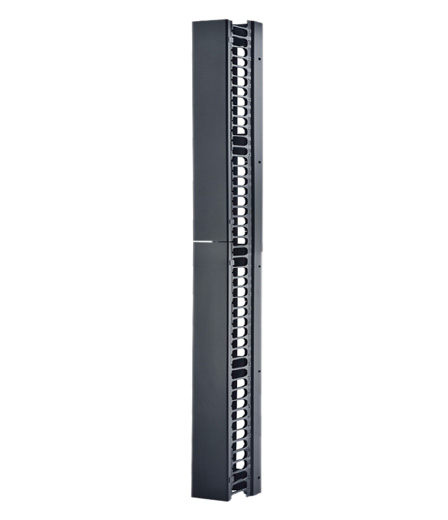
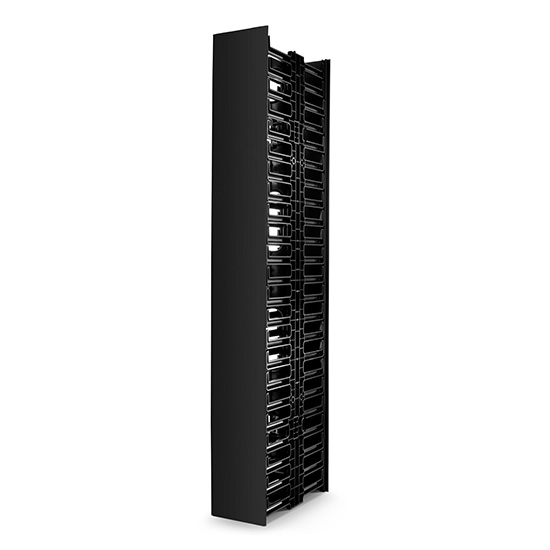
Conventionally, the vertical cable management refers to a solution to secure, bundle and route the cables at both sides of the racks, cabinets, or enclosures. In this management, cable managers can provide a vertical pathway for large numbers of cables from switches to patch panels in the rack system. These vertical cable managers are generally designed in height sizes up to 48U and width size up to 10 inches. The 3” and 5” are the most prevalent width sizes. In addition, the vertical cable managers are often made of metal and plastic. With a range of types of vertical cable management, the most popular vertical cable managers are 5U plastic vertical cable manager with bend radius finger, single D-ring vertical cable manager, and 45U 4.9″ wide plastic vertical cable manager. You can refer to the Figure 1 for these three types as below.

Vertical Cable Managers

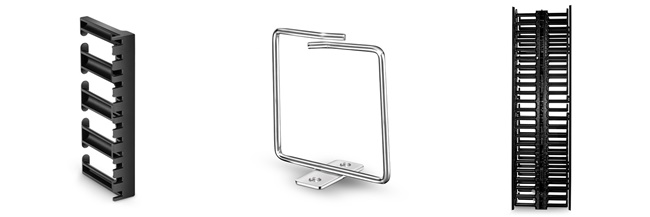
Figure 1: Vertical Cable Managers

Horizontal Cable Management Basics

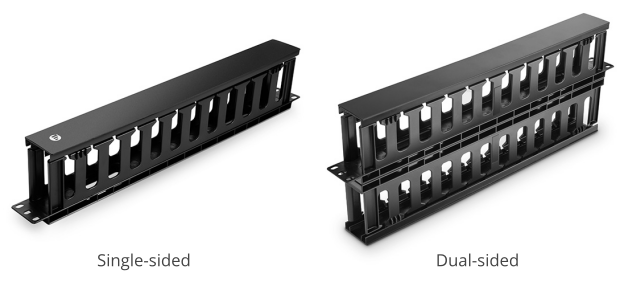
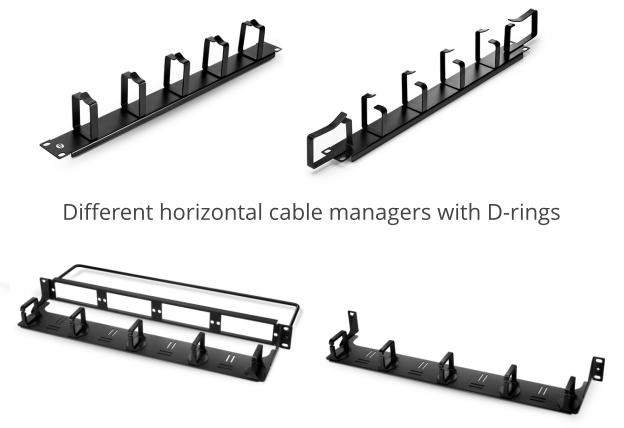
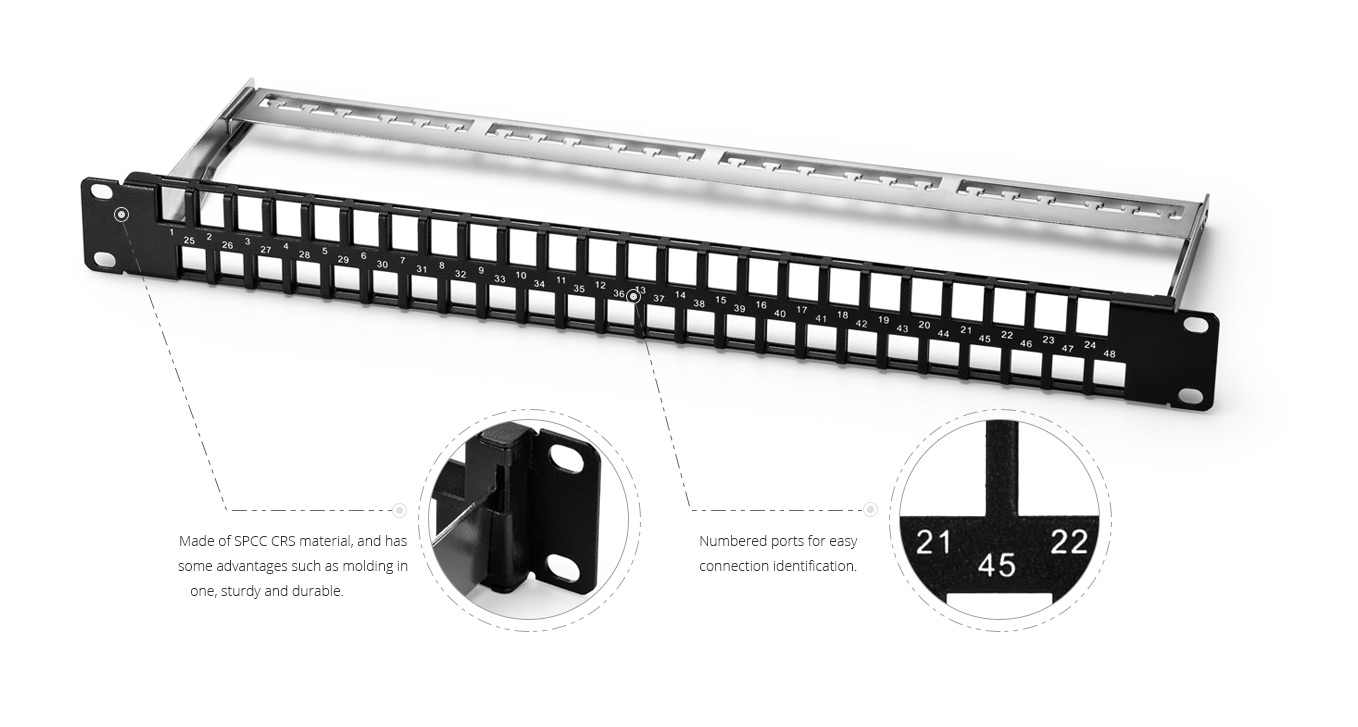
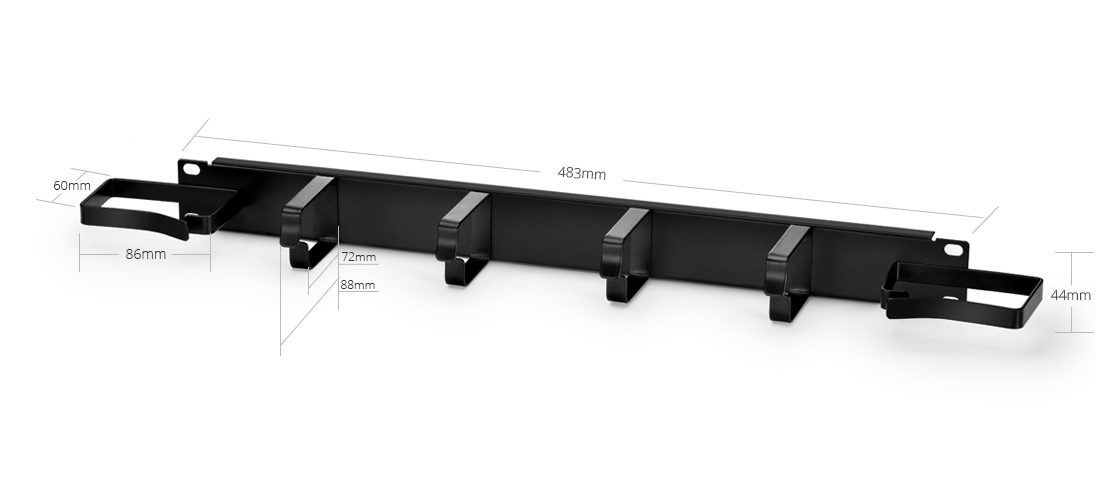
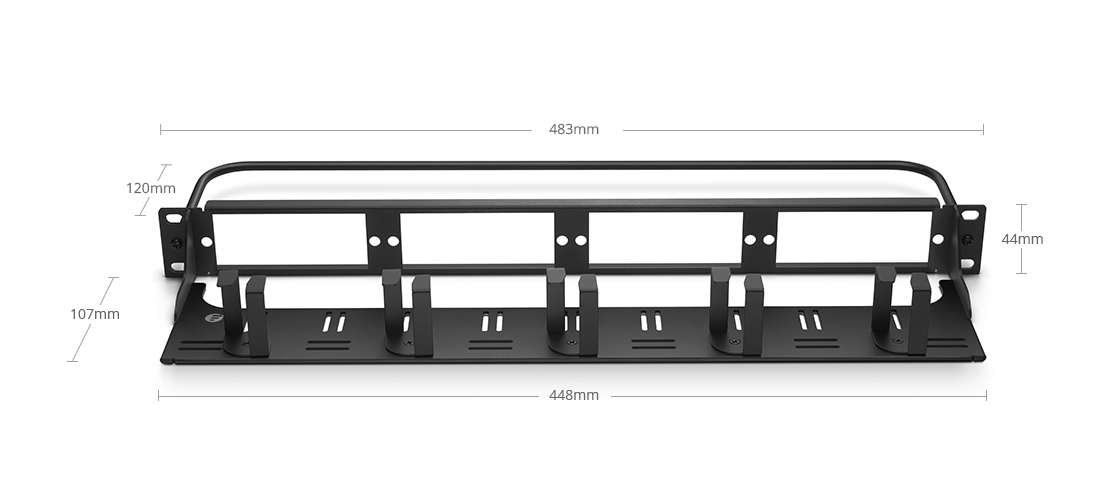
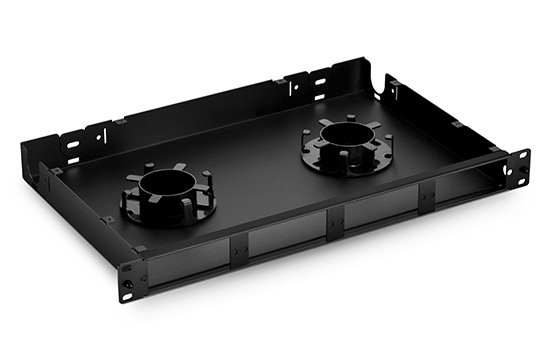
In a horizontal cable management, it allows cable managers, placed in front of cabinets or racks, to manage all sorts of cables, like fiber, coax, patch cables, etc. In that way, cables can be well-organized and protected. It is typically one or two rack units high, or even higher if necessary. In the market, the horizontal cable management 1u version is easily found. Altogether, there are three common types of horizontal cable manager: horizontal cable managers with D-Ring, finger duct, or Brush Strip. You can refer to the Figure 2 as below.

1U Horizontal Cable Managers

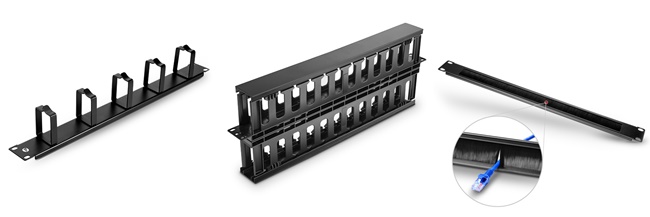
Figure 2: 1U Horizontal Cable Managers

A Comparison of Strengths

As a buyer, if you want to choose a proper cable management, it’s a must to know their advantages and benefits of each type. Actually, for cable management, no matter a vertical or horizontal way, they both share similar features. For example, they both greatly improve network performance by enhancing airflow and cooling efficiency and protecting cables from potential damages and dust, like improper bends, movement or sharp edges. Moreover, a neat management will also add aesthetic value to the working place. Besides, the two management ways also bear with their unique traits.

Advantages of Vertical Cable Management

By reducing signal interference, the vertical cable management can greatly enhance the network performance. In a vertical cable management, it separates power with data cables within the racks, which greatly lower the chance for crosstalk and interference between them.

Additionally, cost reduction will also be the unique trait for vertical cable management. Vertical rack cable management with bend radius fingers is used with angled patch panel directly. In that way, the use of horizontal cable management panels can be reduced, which is a good way to save cost.

Advantages of Horizontal Cable Management

First, downtime minimized. Using a horizontal cable manager, cables can be settled in an ordered way instead of being tangled with each other. Especially, when something goes wrong, this will make technicians more easily to identify and access where goes wrong and fix it in far less time.

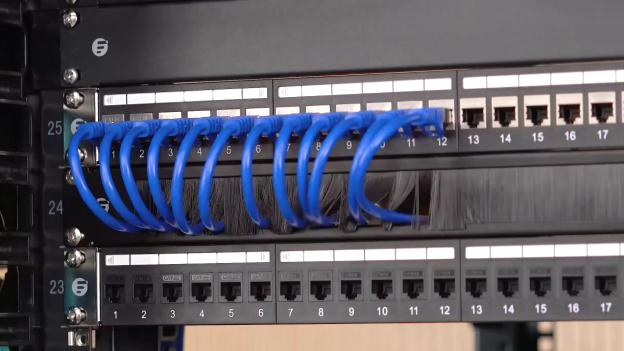
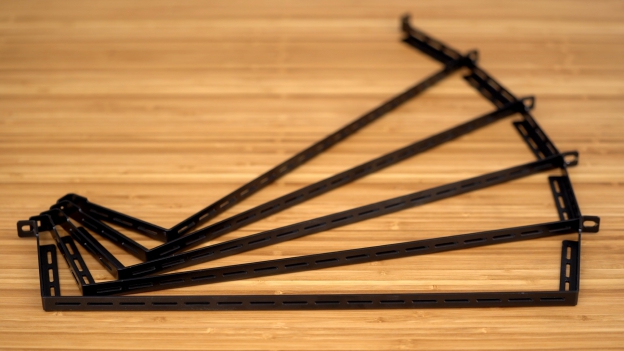
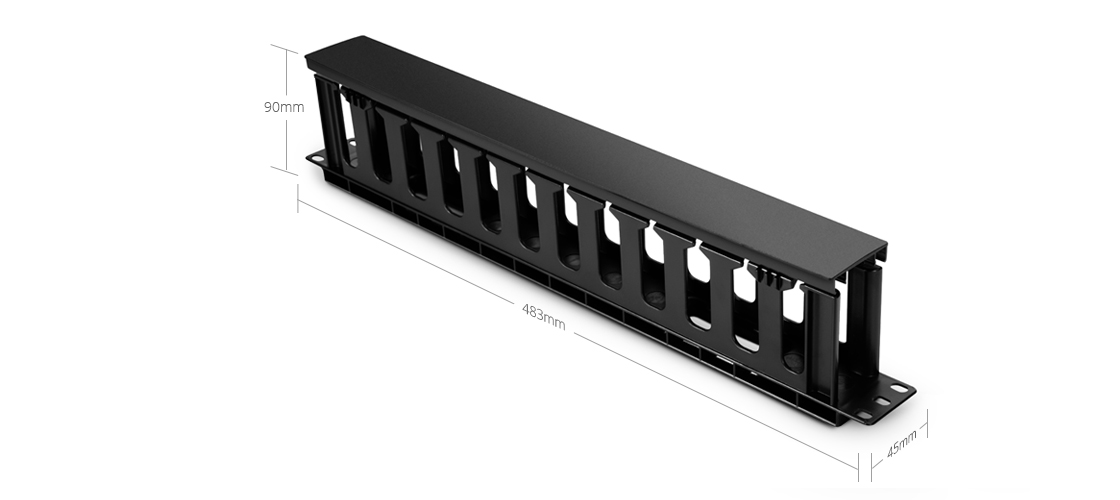
Second, growth promoted. By using horizontal cable managers, consolidating devices within racks or adding additional racks without messing up cables will no longer be a tricky task for IT technicians. Since cables are able to be identified easily, tracing what goes where in a move can be much easier at the time when you add new ports and cables. For your better understanding, you can refer to this 1u cable management device at below.

1U Horizontal Cable Management Panel with Finger Duct

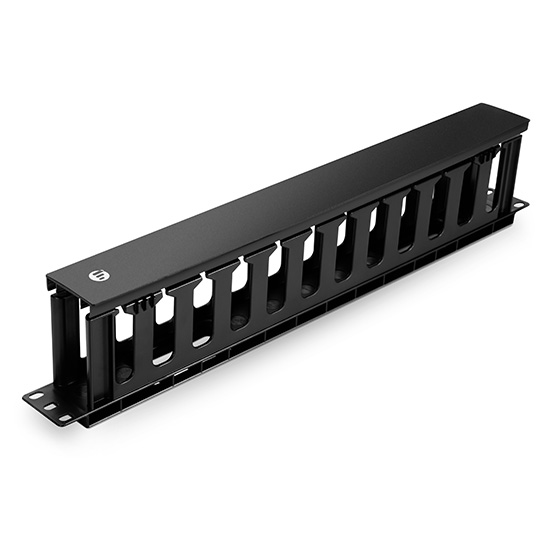
Figure 3: 1U Horizontal Cable Management Panel with Finger Duct

Buyers’ Guide

Just as the saying, the information makes winners. If you want to be a winner in cable organizing, there are mainly three steps you can follow. First, you need to have a proper planning before installations. Decide the number of cables and connections needed, and where the cables should be routed within the rack. Then you need to have a command of industry standards such as ANSI/TIA and ISO/IEC, as well as any federal, state or local regulations regarding cabling. According to that, you can start to choose your cable organizers. In fact, it’s hard to conclude which type is best when considering their similarities and peculiarities. It depends on actual conditions of your network, such as installing space, cable numbers, and sizes of your rack, etc. Sometimes, you may even find that a combination between vertical cable management and horizontal cable management suits you best.

All You Need Is 1U Cable Manager

Have you been fed up with a frequently messy network, performance issues, and data transmission errors? 1U cable manager comes in, all your problems out. As its name shows, the 1U cable manager is a device placed in front of a cabinet or rack and manage all sorts of cables, like fiber, coax, patch cables, etc. In that way, cables can be well-organized and protected. Here, “1U” refers to the height of racks or cabinets of a standard unit, usually 1.75 inches height. Therefore, 1U cable management also refers to the horizontal cable management.

Types of the 1U Cable Manager

Altogether, there are four common types of 1U horizontal cable manager in the market: horizontal cable managers with finger duct, D-ring, brush strip, and the L-shaped horizontal cable manager. Each type has its own traits and applications.

1U Horizontal Cable Manager with Finger Duct

The horizontal cable management device of this type is one of the most popular solutions to organize cables in the market. This 1U cable manager consists of three parts: 1U cable management panel with pass-through holes, finger ducts, and a removable top cover. The finger ducts and the pass-through holes are designed to route cables and reduce the cable strain. As for the removable cover, it makes bundled cables to be easily added or removed; besides, it protects cables from damage or dust. In most cases, this cable manager is made of plastic and is available in single-sided or dual-sided. The dual-sided horizontal cable organizer can support for front and back cable management in a more flexible way.

figure 1 single-sided and dual-sided 1u cable managers with finger ducts

Figure 1: Single-sided and dual-sided 1U cable managers

1U Horizontal Cable Manager with D-Ring

The horizontal cable manager with D-ring usually consists of the horizontal lacer panel and D-rings, and sometimes D-rings will be set with a 1U patch panel and a lacing bar. In most cases, it is made of steel providing great durability. And the robust ring can route large amounts of cable through it. Cable managers of this type can be used in multi-media applications with all coax, copper, and fiber optic cables. This 1U cable manager provides an open-access management tool with great flexibility. That is to say, following the demand to add or reduce cables, the D-ring can be added or removed as the requirement.

Figure 2: Different horizontal cable managers with D-rings

Figure 2: Different horizontal cable managers with D-rings

1U Cable Manager with Brush Strip

Horizontal cable manager with brush strip is often made of high-quality steel and high-density nylon bristles. This type is designed to increase overall airflow within the cabinet network, helping to prevent equipment from overheating, dust, dirt. This 1U cable manager is the best choice for routing cables from the front of the rack to the rear in a simply organized way.

figure 3 1u cable manager with brush strip

Figure 3: 1U cable manager with brush strip

L-Shaped 1U Horizontal Cable Manager

L-shaped horizontal cable manager or L-shaped horizontal lacing bar is made of high-quality cold-rolled steel plate. It is an efficient tool for rack or enclosure cabling. The manager’s angled “L” shape can ensure a proper cable bend radius so that it can greatly avoid cable strain and prevent damage to ports on your rack-mount equipment.

figure 4 L-shape-lacer-bar

Figure4: L-Shaped Horizontal Cable Lacer Bar with Angled 4” Offset

How to Choose a Cable Manager

There are various types of cable managers. Besides the 1U cable managers introduced as above, the vertical cable manager is also a common type found in the market. As for the vertical cable manager, it also consists of different kinds with different features for different applications. When you want to buy one, it’s easy for you to get lost. There are some tips that may help you with it. At first, you should have a basic idea of your situation of the equipment that the cable manager is going to place. Is the horizontal way or the vertical way more suitable for you? Then you should consider the cable you are going to manage, such as the quantity and the material. Are you going to handle with fiber, coax, or copper cables? Do you need a compact cable manager or a loose one? Would you prefer a single-sided one or a dual-sided one? Next, you still need to think about expecting functions for this manager. Apart from organizing cables, do you want to increase overall airflow, or prevent overheating and dust, etc? Then, you should take into account the size, making you managers’ sizes fitting for your cables and equipment placed with.

Conclusion

With 1U cable manager the messy network will no longer be a problem for us. It makes full use of our space in a scientific way. Making the network environment more organized and neat, and also avoiding some potential threats to out network safety. In addition, the cost for a 1U cable manager is within our reach. With so many strengths, you are never too early to buy one.

Introduction of Patch Panel Types

Patch panel, an unsung hero, is the most important cable management tool of the data center. When you want to connect a vast number of devices to a central server or other network hardware, there must be plenty of various cables, and you have to plan each thing out properly. It’s always smart to use a patch panel to help you manage the cables and keep your server room organized. However, patch panels are available in different ports and applied in various cables, like 24 port or 48 port patch panel, Cat5e or Cat6 patch panel. There are so many patch panel types on the market that make you confused. Usually, patch panels can be used in two systems, fiber and copper cabling systems. Therefore, patch panel types will fall into two main categories, fiber optic patch panel and Ethernet patch panel.

Fiber Optic Patch Panel

Fiber optic patch panel is applied in distributing the single mode and multimode fibers to realize the connection, allocation and scheduling between the weak trunk and level system. Often times, two ports stand together on a panel are prepared to connect a pair of wires. One port acts as the transmitting end while the other is the receiving end. Due to different port designs like SC, LC, FS.COM launched LC patch panel and SC patch panel with 24 ports and 48 ports, and blank patch panel.

LC Fiber Patch Panel

Constructed of light weight, high strength steel with black coating, a 24 port patch panel is robust and designed to be installer-friendly. The design includes integrated cable management features to connect 48 single mode or multimode fibers, and provide proper strain relief for those fibers. Often times, the panel used to connect single mode fibers adopts the blue design, while multimode type takes aqua. The following figure is an example of single mode LC patch panel.

 LC patch panel

Figure 1: 24 Port LC Fiber Patch Panel

SC Fiber Patch Panel

This 24 port SC patch panel is made almost the same size with the LC fiber patch panel but in different port. Designed for OS2 fibers, it uses the blue design.

SC patch panel

Figure 2: 24 Port SC Fiber Patch Panel

Blank Patch Panel

The 1U blank panel fits all 19 inch standard server rack and cabinets. The panel uses metal material which helps ensure superior thermal insulation performance. It’s an ideal tool for improving airflow within the rack by covering the unused spaces.

blank patch panel types

Figure 3: 1U 19″ Rack Blank Panel

Ethernet Patch Panel

Functioned like the fiber optic patch panel, Ethernet patch panel is used to connect specific cables like Cat5e, Cat6 cables, creating a standard-based and flexible copper platform. Designed for shielded and unshielded cables, FS.COM published shielded/unshielded Cat5e patch panel and Cat6 patch panel.

Cat5e Patch Panel

This 24 port shielded Cat5e patch panel enables quick and easy cable patching by plugging Cat5e cables into any of its RJ45 ports. Made from SPCC and ABS plastics material, it can stand up to the conditions where the temperature varies from -25°C to 70°C. Clearly numbering on the front allows for easy identification of cable runs. With the connections of 24 Cat5e cables, this 1U rack mount patch panel will maximize your network performance.

cat5E patch panel

Figure 4: 24 Port Cat5e Patch Panel

Cat6 Patch Panel

This 1U rack mount unshielded Cat6 patch panel is designed with the same process of 24 port Cat5e patch panel. This 24 port patch panel for Cat6 cable is rated up to 1Gbps and meet T568A/T568B standard, which will keep up with the greatest of changes in your network.

cat6 patch panel

Figure 5: 24 Port Cat6 Patch Panel

Conclusion

When you decide to buy one, figure out what cables you need to connect first, then choose the suitable patch panel. FS.COM offers a comprehensive line of patch panel types to support your data center patching needs in current 10G and next generation 40G or 100G applications.

Feed Through Patch Panel Recommendations

Patch panels act as the central role in the administration of the telecommunication network. They form the primary link for collecting cables and routing data to the place where it needs to be. The most copper cables in network presently use Cat5e patch panel or Cat6 patch panel. However, there are various styles of Cat6 patch panels on market, like punch down or feed through patch panels. Consumers may be confused when they need to select one. Here I’d like to talk about Cat6 feed through patch panel and recommend some for your reference.

Why Choose Feed Through Patch Panel

Compared with punch down type, there is no need to punch down cables with feed through panel. Unlike the punch down panel that needs to punch down Ethernet cables for the rear side, feed through patch panel have RJ45 ports on both sides, making install cables is fairly simple. Though the price is a bit higher, the feed through panel saves time and energy for cable management.

Feed Through Patch Panel Recommendations

FS.COM offers feed through patch panels with different styles making them ideal for any installation in server racks. Here is a video to show the products.

Unshielded Feed Through Patch Panel

Unshielded patch panel is used to connect unshielded cables that actually with faster transmission in the absence of electromagnetic interference (EMI). The following is a 24 port Cat6 unshielded feed through patch panel at the price of 30 dollars. It meets Cat6 specifications and works with T568A and T568B wiring to comply with industry standards. Made from SPCC+ABS plastics material, the Cat6 patch panel features 24 numbered ports to help you identify connections. And it’s supplied in black color.

unshielded feed through patch panel

Figure 1: 24 Port Cat6 Unshielded Feed Through Patch Panel

Shielded Feed Through Patch Panel

Shielded patch panels are recommended for high EMI environment, because shielded cables can more effectively block interference. Therefore, shielded panel is more expensive than unshielded one, this 24 port Cat6 shielded patch panel costs 43 dollars at FS.COM. Made to be efficient and durable, the Cat6 feed through patch panel is constructed with a fully enclosed, 6 port module design, which provides flexibility and protection of printed circuitry of termination. With a cable management bar on the rear, it helps Cat6 cables to pass through patch panel in a neat and organized way.

shielded feed through patch panel

Figure 2: 24 Port Cat6 Shielded Feed Through Patch Panel

Blank Keystone Patch Panel

To meet customers’ different usages, FS.COM produced blank keystone patch panels that are available in 24 port and 48 port. Here is the 48 port patch panel which offers unlimited flexibility and ease of installation to the customers. The port openings will accept both Cat5e and Cat6 insert modules, thus a mixed connection will be made. Designed with a stainless steel cable manager on the rear, this patch panel keeps cabling neat and tidy, and can mount to any standard 19 inch server rack. Beside, it has a favorable price of 11 dollars.

blank keystone patch panel

Figure 3: 48 Port Blank Keystone Patch Panel

Conclusion

To sum up, when you need to connect the unshielded cables choose the unshielded feed through patch panel, while use the shielded panel to link shielded cables. And if you want to make a mixed connection, choose the blank keystone design. FS.COM patch panel offering includes copper and fiber types which are in stock and ship the same over the world. Welcome to pick at FS.COM!

How Much Do You Know about 1U Horizontal Cable Manager

1U horizontal cable manager is the ideal solution to manage cables on the front and rear of each 19 inch server rack. Because with the emergence of high density rack-based IT server installation, data communication and cabling that must be processed within the tight rack space. Horizontal cable manager is regarded as the horizontal cable organizer, which can avoid cable damage and failure, ensuring the network operation.

Why Do We Need 1U Horizontal Cable Manager

1U horizontal cable manager is one tool of cable management that matter the whole network system health. It offers a neat and simple way to manage the cables, and simplifies network maintenance and costs. This is the main reason that makes it popular in the data center.

For the technicians who want a clean and orderly work area, they can make the cables go through the 1U horizontal cable manager, creating a clean look for the rack.

For the technicians who have a desire for easy maintenance and low costs, the cable manager can help them protect the cables radius bend and reduce the wear and tear, which decrease the cables expenses in some sense. Besides, it provides easier access to internal rack components, performing easy move, adds and changes to connections, which can greatly save time and money.

How to Select 1U Horizontal Cable Manager

FS.COM offers some styles of 1U horizontal cable management tools with different options of cable support. Choose the appropriate cable management device based on your actual needs.

1U Horizontal Cable Manager With End Rings

This cable manager uses a sturdy SPCC metal construction with a max cable capacity of 70. Due to the design of four D-type rings on the panel and two rings on both sides, it can manage vertical and horizontal cabling at the same time. In addition, the rings can provide cable strain relief for more reliable connections.

1U horizontal cable manager with end rings

1U Single Sided Horizontal Cable Manager With Finger Duct

It’s a solid little cable manager with flexible fingers on the front, which can offer a proper bend radius protection. Although the manager is made primarily from plastic material, it’s extremely tough and has excellent wear resistance. The max cable capacity of this single sided horizontal cable manager is 44. Furthermore, there is a detachable cover on the fingers that can protect the cables from the dust and give you a more professional rack looking.

1U single sided horizontal cable manager with finger duct

1U Blank Rack Mount Fiber Patch Panel With Cable Management Panel and Lacing Bar

It has five rings stand vertically on the front panel. The lacing bar is dismountable that allows users to put it on the front or back of a server rack according to their cable management demand. With the black metal design, it tends to be highly durable which reduces the equipment spending.

1U blank rack mount fiber patch panel with cable management panel and lacing bar

If you want to house the vertical and horizontal cables simultaneously, 1U horizontal cable manager with end rings is an economical choice. If you are in favor of a dustless environment, 1U single sided horizontal cable manager with finger duct can satisfy your requirement. If you want a more flexible cable solution, then choose 1U blank rack mount fiber patch panel with cable management panel and lacing bar.

Manage cables in the server rack with FS.COM 1U horizontal cable manager. These cable management devices are made from the highest quality materials to provide an unique method for the cross connect.

Patch Panel Installation Guide

It’s well known that network technology is changing, but the critical aspect can’t be changed or replaced—patch panel cable management. If the key component is missing, the data transmission will be interrupted and fail to arrive at the destination. Patch panels, as the nerve center of a network system, can ensure the signal to work in ordered and friendly way. But how to install patch panel? And what’s the patch panel installation guide? This article will give you several suggestions.

Types of Patch Panel  

Patch panels are available in copper and fiber cables. And designed with different port types and uses, patch panels from FS.COM are divided into 24 LC fiber port patch panel, 24 port SC fiber patch panel, 48 port LC fiber patch panel and so on, and copper patch panel can fall into 24 port cat6 shielded/unshielded patch panel, 24 port cat5e shield/unshielded patch panel and 24 port blank keystone patch panel. Here, we will take the 48 port LC fiber patch panel as the example to explain the patch panel installation.

48 Port LC Fiber Patch Panel

With the size of 19”×1.73”, this fiber optic patch panel is suitable for installing on the 19 inch server rack. It has duplex LC adapters that allow a two-way data transmission between the connecting devices. The 48 port LC fiber patch panel uses C.R.S powder coating, which is fully in line with national environmental standards, can be placed indoors. High density port design makes it connect 96 OM3 or OM4 fibers at most, which is much more than the 24 port patch panel.

48 Port LC Fiber Patch Panel

Patch Panel Installation Guide

Only follow the right steps can achieve a reliable network. There are two aspects of patch panel installation guide for your reference.

  • Planning. A successful work starts with a good planning. You should figure out the issues, the network speed, distribution location, and cables length. Make sure you know the specification and design of the patch panel installation.

  • Preparation. Preparation work can reduce disconnect time. Prepare the main tools, 1U rack mount fiber enclosure, 48 port LC fiber patch panel and screws. Check the cable length for ensuring the cables that could be long enough to pull. And label the ports to identify different cables, in order to guarantee the technicians to have clear information on what they need to do.

Installation of 48 Port LC Patch Panel in a Server Rack

First, we should install the 48 port LC patch panel in the 1U rack mount fiber optic enclosure. Remove the front panel of 1U rack mount fiber enclosure, then install 48 port LC patch panel and fasten the screw.

Second, fix the equipment in the server rack. And leave some space between the patch panel and other devices, for cables management and future change.

Patch Panel Installation Guide example

Third, try to connect OM3 or OM4 cables to the patch panel in one pull, which helps to protect the bend radius. Comb and bundle the cables, and put them into the patch panel trunking, then cover it with top panels.

Last, don’t forget to clean the work area when you finish the patch panel installation, because the optical fibers are sensitive to dust and dirt. Therefore, try to keep clean when working with fiber optic cables to make them achieve their full performance.

FS.COM offers a vast selection of patch panel installation products and accessories that meet the international standards for supporting your network needs. For more details, please contact us via sales@fs.com.

How to Deal with Server Room Cabling Nightmare

It’s well known that server room has become an important indicator of one’s healthy network. Although wireless technology can avoid the possibility of cable clutter when compared with the wired connection, sever rooms still have lots of network cables, fiber optic cables and peripheral wiring. Thus server room cabling nightmare may appear if the big amount of cables on the server rack is disordered. For installers and engineers, it’s important to avoid server room cabling nightmare to ensure a well operated network center.

Reasons to Avoid Server Room Cabling Nightmare

Often times, the server room cabling nightmare is related to crowding and stacking things. For example, new equipment may be piled up around or on the top of the old equipment. Disordered cables look like a big bowl of spaghetti that may wreak havoc on the server environment.

  • It costs you in equipment wear and tear. When the excessive cables and extra equipment are placed together in a server rack, it may result in equipment overheating since the cables block the airflow or ventilation, generating much heat and stress, which may eventually lead to slow-down and even shorten the life of all equipment.

  • It costs you time and money. The fiber cables and power cables will easily become twisted if the cables are not managed well. In turn, this will cost you a large amount of time to dig through the server mess when you want to change the specific or broken cables.

Tips for Organizing Server Room Cabling

To avoid server room cabling nightmare, here are several tips for you to organize the cabling.

  • Make the server room dust-free. Dust not only makes the room look dirty, it also can fall into the hardware and cause equipment failure especially when it piles up inside the hardware vents. Therefore, the heat can’t be dissipated from the equipment which will lead to overheating. Thus, the server room should be cleaned every day to prevent dust accumulation.

  • Apply sound cable management. Poor cable management will not make positive effects on network system, instead, it may cause hardware malfunction. Proper cable management tips contain the colored labels for identifying, suitable fiber optic enclosures for cable managing. In this way, the cables can be protected from winding.

  • Spacing the equipment. When you decide to set up the server room, make sure that you have planed where to place the racks. A suitable distance should be measured between each rack for air dissipation and future expansion. In addition, the location of equipment such as fiber optic patch panel and switches in a rack should be considered.

End Server Room Cabling Nightmare with FS.COM Equipment

There are several equipment from FS.COM to help you maintain a neat and tidy server room, avoiding server room cabling nightmare.

42U Server Cabinet  

42U black server cabinet can accommodate all 19 inch EIA standard networking equipment, providing additional space at the rare for cable management. It consists of several major components, top panel, split side panel, equipment rail, and perforated front door. In the back, it adopts the design of air mesh which allows ventilation and heat dissipation. The cabinet uses SPCC cold roll steel material, firm and durable. It’s the simplest way to handle hundreds of cables.

cabinet for solving server room cabling nightmare

1U Rack Mount Fiber Enclosure

1U rack mount high density fiber enclosure is available for 4 fiber adapters or cassettes that can connect 96 fibers. The body is made of SPCC cold-rolled steel plate, finished with electrostatic powder spraying. It can maximize the use of limited space in a rack to protect and manage fiber cables with easy installation.

fiber optic enclosure

Server room cabling nightmare is the greatest challenge in the network system. To solve this problem, it should be done with the professional network solution supplier FS.COM. For more details, please visit FS.COM.


Structured Cabling Installation

Structured cabling installation is the main part of a flexible structured cabling system that will support different hardware uses and satisfy current and future demands. Since the thousands of forms of online data transfer, and the gathering of business intelligence has made a significant influence on today’s commerce, the companies want reliable and structured cabling installation to hold the infrastructure of data connections. Now, I want to share something about its installation with you.

Importance of Structured Cabling Installation

A proper structured cabling installation gives a universal platform on which you can build the overall information strategy, supporting multiple voices, data and media system, regardless of who manufactures these. In essence, compared with traditional point to point cabling system, the structured cabling system is more neat and organized. It has many benefits for one’s network operations.

Support future upgrade. High bandwidth is the most significant benefit of the structured cabling, which makes it a reliable infrastructure for business data growth. With structured cabling, you can ensure connectivity of the enterprise while business divests into new technological areas and equipment.

Reduce cabling bulk and congestion. The organized and planned cabling system can accommodate smaller diameter trunk cabling, and makes a cleaner cable management.

Reduce installation time and cost. Using a structured cabling system, users just need to plug the equipment cables into the matched sockets when upgrade or change the network. No need to buy additional wires or adapters.

Tips for Structured Cabling Installation

Since the structured cabling is the critical part of one’s network, here are several tips for the proper installation.

Planning comes first. In this stage, you must have a comprehensive understanding of your actual needs, figure out a solution based on the location, cabling types, and the needed equipment. Planning the installation will enable the actual work and operations run more smoothly.

Follow the cabling standards. When you install the cables, please follow the cabling standards because there are standards that have specified the multiple cables for different uses. Following the standards will greatly improve the efficiency of cables and data networks.

Remember the maintenance is important. Once the cables are installed, the maintenance becomes important. Buy a server rack or other equipment to manage and maintain the cables, which will save you lots of money and time in reality.

Choose the Right Equipment for Structured Cabling Installation

Vertical cable management and horizontal cable management are the two methods used in structured cabling installation. Choose the right equipment is the top priority. There is some equipment from FS.COM.

Single sided and dual sided vertical cable manager are available on FS.COM. This 45U 4.9″ wide plastic single sided vertical cable manager is designed with flexible fingers to protect cable radius against damage. It can route cables vertically either on the front or back of racks. With a PVC cover, the equipment can avoid the dust and increase service life.

vertical structured cabling

1U 19inch blank rack mount fiber patch panel is commonly used for horizontal cable management. It offers different choices for one’s application by being separated into patch panel, D-rings and lacer bar. This equipment is a cost effective cable management solution used in high density cabling system in data centers and telecommunication rooms.

horizontal structured cabling

From the above, we know structured cabling is the backbone of all business. FS.COM is the “one stop shop” for all cabling installation.

1U Rack Mount Enclosure Inside Cabling Installation

Rack cabling may be the backbone of one’s information technology operation. All data or signal are delivered by the cables, so maintaining and running the critical circuits that are managed by these cables are of great importance. Any mishandled cables on the key link paths can lead to bad results, such as data transmission errors or performance issues. So how to organize and protect fiber cables? This 1U rack mount enclosure will help you. First, let’s look at the structure of 1U rack mount enclosure.

Structure of 1U Rack Mount Enclosure

Before we properly use fiber optic patch panel, we should have a better understanding of its structure. The following 1U rack mount patch panel is from FS.COM. It can support 4 fiber adapter panels or MTP/MPO fiber optic cassette. The top cover can be removed, which is convenient when installing the adapter or cassette. Inside the enclosure, there is nothing except two fixed screw holes position, which enables users to settle the panels or cassettes. Each rack mount enclosure is shipped with an accessory pack that includes mounting screws, spools, bend radius brackets for proper installation and cable ties for cable management.

1U Rack Mount Enclosure

Devices Used for 1U Rack Mount Enclosure Inside Cabling

There is a video to show clearly how 1U rack mount fiber enclosure inside cabling works. Here, we need 24 fiber optical splice tray, LC fiber adapter panel and spliced fiber pigtail.

Splice tray is a device used with other equipment to hold and protect optical fibers. This 24 fiber optical splice tray is equipped with self-contained slacking and spooling, mechanical splice holder, self-stacking modules with side latches and clear plastic hinged cover, designed to safely route and store optical fiber.

LC fiber adapter panel is designed for use with FHD series rack mount enclosures, providing a good protection for cables.

Fiber pigtails are used in terminating fiber cables through fusion splicing, in order to achieve accurate mounting for precision alignment of fiber optical components.

1U Rack Mount Enclosure Inside Cabling Installation

According to the video, the installation can be divided into two parts, fiber optic splice tray installation and cassette or adapter installation.

Step one, install fiber optic splice tray first. Undoing the screw to remove the top cover. Put 24 fiber optical splice tray into the 1U rack mount enclosure, and align the screws at the screw holes, then use a screw to fix it. Position another splice tray upright the fixed one. The 1U enclosure can hold 4 splice trays. Last, use a cable tie to make sure the fiber cords at the right location.

Step two, install cassette or adapter. Place slack spools over plastic rivets studs on sliding tray in a new 1U enclosure, and use screw to fix slack spools. Then insert LC fiber adapter panels into the enclosure. Unplug dust caps and connect the fiber pigtails. Note that make the pigtails go through the grommet for dust prevention. Finally, close the top cover.

FS.COM developed the 1U rack mount enclosure inside cabling installation to guarantee the smooth operation and efficient cable management of customers’ network. More details, please visit FS.COM.

Dual Sided Vertical Cable Manager-Vertical Cable Management

As we know, proper cable management is part of one’s network’s performance and effectiveness. However, do you know what is the most difficult area of cable management? It’s the area on the equipment rack itself. You can manage the overhead cables by mounting them to the superstructure, and use a simple raceway-type solution to deal with the underfloor cables. But how to handle the rest cables vertically? Absolutely, You need a vertical cable manager. Vertical cable manager is used to house and organize fiber and copper cabling for good vertical cable management.

What Is Vertical Cable Manager?

Like the name implies, vertical cable manager is the equipment installed vertically. It can be installed on both sides of a rack or cabinet so that it can be called dual sided vertical cable manager. This kind of vertical cable management makes the utmost of the extra space of rack’s two sides to route fiber optic cables or patch cables effectively, while creating no impact on access to the equipment in the rack.

Dual Sided Vertical Cable Manager

Why We Use Dual Sided Vertical Cable Manager?

Some persons may ask, for cable management, I have selected the fiber patch panel, rack or cabinet to manage cables. Why do I still need to use the dual sided vertical cable manager? Let me answer it, because they are different cable management tools. Fiber optic patch panel is used to manage the equipment through the network cabling system. Data or signal can be delivered within a fiber patch panel, thus the data or signal can reach to the equipment successfully. A rack is the facility storing fiber patch panel, hard disk drivers and some computer correlation equipment. The dual sided vertical cable manager is just applied for tidying cabling which is along the sides of a rack. Remember, this equipment is not related directly with the network.

Using a dual sided vertical cable manager, technicians can snap off fingers, minimize downtime, maximize space, which brings a good network environment.

How to Use Dual Sided Vertical Cable Manager?

Here is a video to show you how the dual sided vertical cable manager works. It takes 45U 4.9″ Wide Plastic Dual Sided Vertical Cable Manager from FS.COM as an example. This product uses an oval hole design, making it easy for front-to-back cable routing. Flexible fingers on both sides ensure optimum cable radius not to damage cables. And to protect cables from damage or dust, the cable manager uses a PVC cover. After knowing the features of the product, let’s see how it works.

First, install the dual sided vertical cable manager. Put the plastic cable guide part on a flat surface. Then place the other cable guide over the connector brackets and press firmly until fully seated.

Second, position the cable manager next to the rack. Use the inserted brackets mount the vertical manager solidity to the rack. You can couple two 22.5U sections together. After that, insert each door into the hinges and press it tightly until it quickly settles.

Last, route cables through fingers of the dual sided vertical cable management.

Conclusion

Dual sided vertical cable manager is the compact and versatile solution in the server room or data center. With rich experience in this realm, FS.COM is engaged in offering best and excellent quality products of vertical cable management.