Cat6a patch panel, a kind of copper patch panel has been an important contributor in 10 Gigabit Ethernet for network connection. Nowadays, it has been in a widespread deployment in Ethernet network cabling. With such a great importance, it’s necessary for us to know how to terminate Cat6a patch panel.

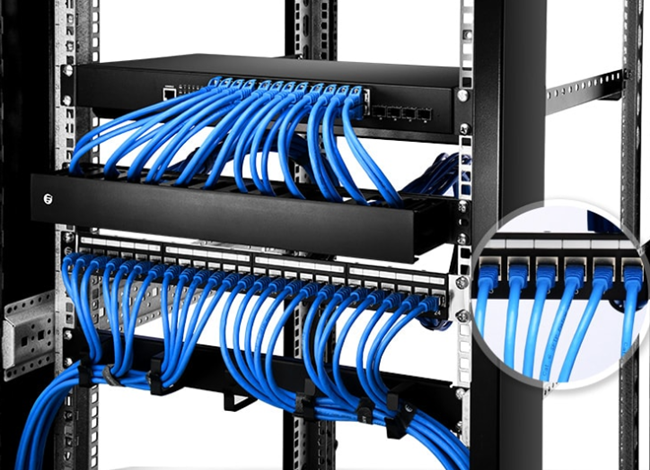
Figure 1: Cat6a Patch Panel Cabling
An Overview of Cat6a Patch Panel
Cat6a patch panel, an improved version of the Cat6 patch panel, is also a mounted hardware assembly containing ports to connect and manage the incoming and outgoing copper cables. Supporting different kinds of Cat6a cables and any earlier generation of Cat cable, it confirms with cabling specifications, like 802.3an (10GBase-T) and TIA Augmented Category 6. By the way, if you want to know more details about Cat6 vs Cat6a patch panel, you can refer to the article, Cat6 Patch Panel vs Cat6a: Difference and Usage.
With different components, there will be corresponding subbranches of the patch panel Cat6a version. If you put ports as a selection basis, there are Cat6a patch panel 12 ports, Cat6a patch panel 24 ports, and Cat6a patch panel 48 ports.
When it comes to the design for high EMI (Electro Magnetic Interference) environments, Cat6a shielded patch panel and unshielded patch panel Cat6a version are found in the market. Moreover, options for connecting methods are also available. You can choose a punch down Cat6a patch panel or a feed-through patch panel Cat6a version.
How to Install Cat6a Patch Panel
Having an overview of the patch panel Cat6a version will be the preparation step to use Cat6a patch panel. As has mentioned in the last part, many types of this cable organizer are available in the market. Different designs come in different wiring methods. The most obvious installing difference lies between punch down Cat6a patch panel or a feed-through patch panel Cat6a version.
Punch Down Cat6a Patch Panel
For the punch down type, on its front plate, it comes in RJ45 ports to directly connect Ethernet cables. While on its rear side, the plate module is set with color markings for punching down Ethernet cables. If you are holding a patch down patch panel Cat6a version, you can follow the steps listed as below one by one:

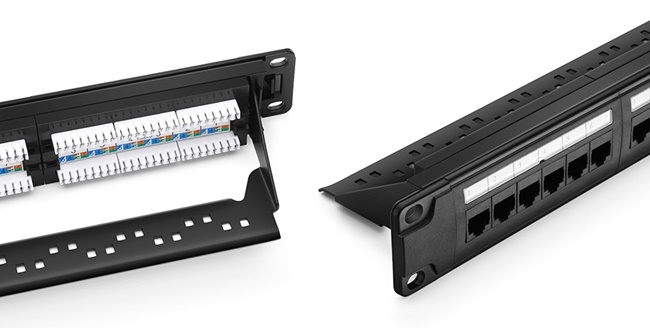
Figure 2: 24 Ports Unshielded Punch Down Patch Panel
First, strip about 3-6 inches of the outer jacket from the end of each cable with a cable stripper.
Second, separate cable wires. After removing the outer jacket, four twisted pairs of exposed wires will be found. You need to split each pair into two single wires.
Third, set all the cable wires into its own slots of the patch panel. Please note that don’t make wires exposed too much or twisted in case of the signal weakening.
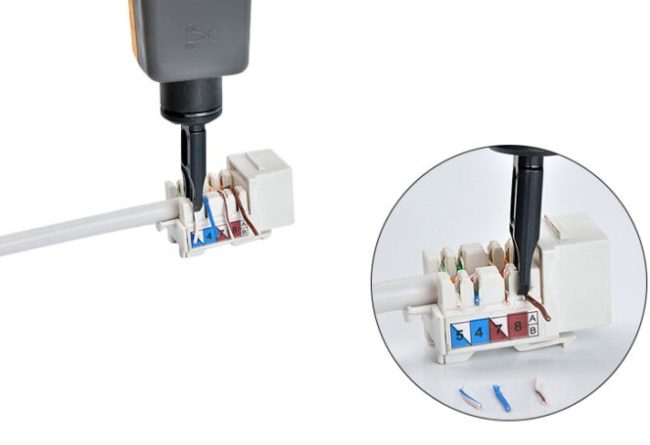
Fourth, terminate each wire. Use a 110 punch down tool to press down on each wire and cut the excess wire.

Figure 3:Using Punch Down Tool to Terminate Wires
Fifth, if there is a need, you can write specific information on labels for identification. For example, you can mark the terminated incoming cables with a label to indicate where the cable is from.
Sixth, inspect the wire. After terminating, you need to use a cable tester to check whether all the wires are terminated correctly.
Feed-through Cat6a Patch Panel
As for the feed-through Cat6a patch panel, its installation will be much easier than that of a punch down type. Since the front and the rear plates of the feed-through patch panel Cat6a version are both configured with RJ45 ports, you can directly insert all the cables into the slots of the panel. For a feed-through Cat6a patch panel, you can take the following steps:
First, hold the drawer of patch panel at the height of the layer of the rack you need to set and push it forwardly.
Second, use the appropriate machine screws to attach the patch panel assembly to the rack.
Third, insert cables into the matching port one by one. After that, you can use a strap to secure the cables.
Fourth, it’s an optional step. Similar with punch-through type, you also can write specific information on labels for identification.
Fifth, you still need to make a visual inspection to ensure the safety of all the network environment.
Conclusion
In this article, you will have a full learning of the Cat6a patch panel from its background information to user guide. As for terminating a patch panel Cat6a version, it is not so troublesome as you have imagined.
