Tag Archives: cable management

How to Install a Keystone Patch Panel?

In this article, we will focus on the installation of keystone patch panel. Previously, we have introduced many solutions for cable management, such as horizontal/vertical organizers, patch panels, rack mounted enclosures, etc. In this post, we will take the keystone patch panel as a case to illustrate how to install it.

An Overview of Keystone Patch Panel

Before the installation, let’s have an overview of the keystone panel. This is also regarded as the preparation stage, which has a great impact on your following installation.

What is Keystone Patch Panel?

Keystone patch panel, also called blank patch panel or unloaded patch panel, is a kind of Ethernet patch panel. Unlike the pre-loaded patch panel, the keystone panel is not configured with built-in RJ45 ports. To set keystone jacks such as Cat5e and Cat6, the keystone panel is often available in two types: 24-port patch panel and 48-port patch panel.
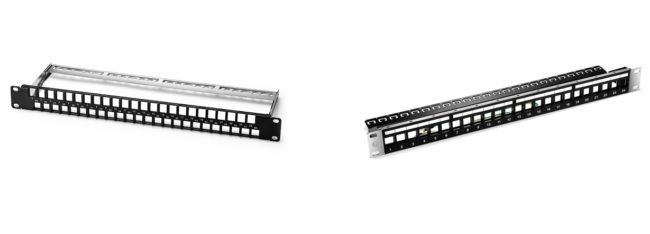
48 Ports 1U Blank Keystone Patch Panel (Left) and 48 Ports 1U Blank Keystone Patch Panel (Right)

Figure 1: 48 Ports 1U Blank Keystone Patch Panel (Left) and 48 Ports 1U Blank Keystone Patch Panel (Right)

Types of Keystone Patch Panel

With different standards, such as ports and keystone jacks, the keystone panel can be classified variously.

According to ports, there are 24-port keystone patch panel and 48 ports panel version. Usually, the 24-port patch panel version is an unshielded/shielded Ethernet patch panel in a compact 1U with STP/UTP. It can accommodate all keystone jacks, including RJ45 Ethernet, HDMI audio/video, voice and USB applications. While the 48 ports panel version can be used as 1U rack-mount unshielded multimedia blank patch panel, also compatible with all keystone jacks.

Classified by keystone jacks, we can also get different types. When the keystone panel is inserted with jacks, we also call the panel as keystone jack panel. Among all kinds of RJ45 keystone jacks, Cat5e and Cat6 keystone jacks are used frequently.
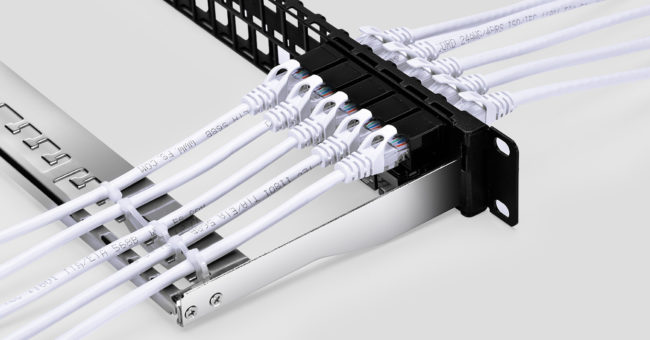
48 Ports Blank Keystone Patch Panel Cabling

Figure 2: 48 Ports Blank Keystone Patch Panel Cabling

Installation Guide

After the preparation step, it’s time for us to move to the installation stage.

First, proper RJ45 jacks should be chosen. As we mentioned before, unlike pre-loaded or fixed patch panels, keystone patch panels have no built-in ports. Therefore, you need to decide the type and quantity of the jack at first.

Second, insert the RJ45 jacks. After choosing the proper RJ45 jack, it’s time for you inlaying the jacks into the slots of keystone  panels, from the rear panel to the front.

Third, install the equipped Ethernet patch panel into a 1U rack with the help of screws and screwdriver.

Fourth, plug cables that you have chosen into corresponding jacks you have inserted into the keystone patch panel.

Fifth, manage cables with the help of cable management accessories such as cable managers, lacing bars and cable ties.

If you are still unclear about the installing process, you can refer to the following video made by FS: Blank Keystone Patch Panel for Cat5e/Cat6 Ethernet Cabling.

Conclusion

Keystone patch panel just likes a joker for its easy matching. It can be customized for users’ cabling requirements. Moreover, installation is also easy to catch. In any case, the keystone panel is a wise choice for anyone requiring easy and direct access for Ethernet cabling.

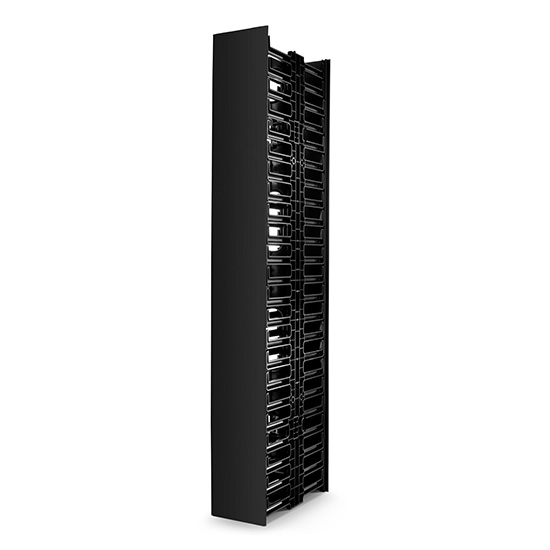
Dual Sided Vertical Cable Manager-Vertical Cable Management

As we know, proper cable management is part of one’s network’s performance and effectiveness. However, do you know what is the most difficult area of cable management? It’s the area on the equipment rack itself. You can manage the overhead cables by mounting them to the superstructure, and use a simple raceway-type solution to deal with the underfloor cables. But how to handle the rest cables vertically? Absolutely, You need a vertical cable manager. Vertical cable manager is used to house and organize fiber and copper cabling for good vertical cable management.

What Is Vertical Cable Manager?

Like the name implies, vertical cable manager is the equipment installed vertically. It can be installed on both sides of a rack or cabinet so that it can be called dual sided vertical cable manager. This kind of vertical cable management makes the utmost of the extra space of rack’s two sides to route fiber optic cables or patch cables effectively, while creating no impact on access to the equipment in the rack.

Dual Sided Vertical Cable Manager

Why We Use Dual Sided Vertical Cable Manager?

Some persons may ask, for cable management, I have selected the fiber patch panel, rack or cabinet to manage cables. Why do I still need to use the dual sided vertical cable manager? Let me answer it, because they are different cable management tools. Fiber optic patch panel is used to manage the equipment through the network cabling system. Data or signal can be delivered within a fiber patch panel, thus the data or signal can reach to the equipment successfully. A rack is the facility storing fiber patch panel, hard disk drivers and some computer correlation equipment. The dual sided vertical cable manager is just applied for tidying cabling which is along the sides of a rack. Remember, this equipment is not related directly with the network.

Using a dual sided vertical cable manager, technicians can snap off fingers, minimize downtime, maximize space, which brings a good network environment.

How to Use Dual Sided Vertical Cable Manager?

Here is a video to show you how the dual sided vertical cable manager works. It takes 45U 4.9″ Wide Plastic Dual Sided Vertical Cable Manager from FS.COM as an example. This product uses an oval hole design, making it easy for front-to-back cable routing. Flexible fingers on both sides ensure optimum cable radius not to damage cables. And to protect cables from damage or dust, the cable manager uses a PVC cover. After knowing the features of the product, let’s see how it works.

First, install the dual sided vertical cable manager. Put the plastic cable guide part on a flat surface. Then place the other cable guide over the connector brackets and press firmly until fully seated.

Second, position the cable manager next to the rack. Use the inserted brackets mount the vertical manager solidity to the rack. You can couple two 22.5U sections together. After that, insert each door into the hinges and press it tightly until it quickly settles.

Last, route cables through fingers of the dual sided vertical cable management.

Conclusion

Dual sided vertical cable manager is the compact and versatile solution in the server room or data center. With rich experience in this realm, FS.COM is engaged in offering best and excellent quality products of vertical cable management.

Single Mode Fiber Patch Panel vs Multimode Fiber Patch Panel

Cable management is the obvious factor of using fiber patch panel. For now, the amount of data that needs to be stored especially in data center has greatly increased and continues to grow, thus there are thousands of fiber connections in data centers, and technical staff needs a high-density solution which can properly deal with the different cables that vary form single mode to multimode. Thus single mode and multimode fiber patch panel are introduced to connecting the matched fiber cables. For single mode and multimode fiber optic enclosure, which one is better? Read this article and find the answer.

Importance of Using Single Mode and Multimode Fiber Patch Panel

Single mode fiber cables should be connected to the single mode fiber patch panel, while the same as the multimode one. This is necessary, because, single mode and multimode fiber cables require different transmission media and paths. Single mode cable needs special laser light transmitter while the transmitter of multimode fiber is the inexpensive LED light source. If not, like using single mode enclosure to connect the multimode fiber cables, this may lead to network failure. Therefore, using the right fiber patch panel is critical for network’s stability, maintenance and operation, as well as decreasing the total cost of ownership.

Difference Between Single Mode and Multimode Fiber Patch Panel

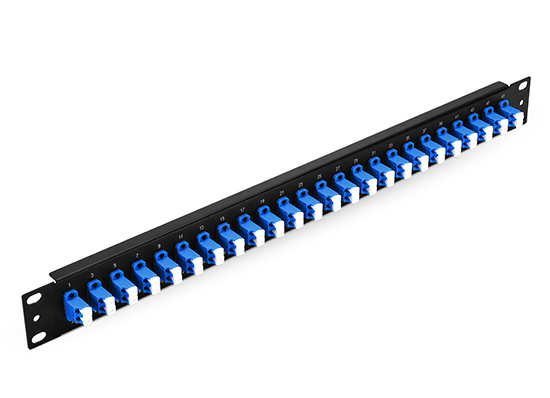
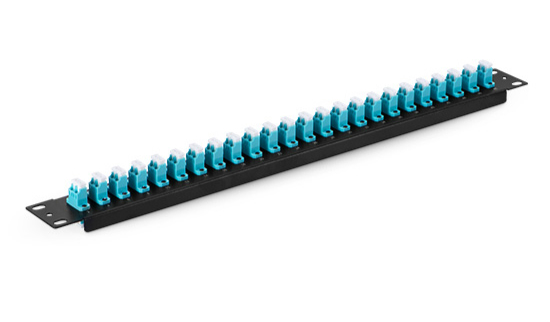
Obviously, the two fiber patch panels are used for different fiber cables, as stated in above content. Besides, the connector colors of both fiber patch panels are different. Single mode fiber patch panel usually takes aqua design while the multimode one is blue. Thus a quick look at the fiber patch panel may tell users which fiber cable should be connected to the security device.

Choose Single Mode or Multimode Fiber Patch Panel?

The product 48 Fibers, 24 Ports LC Duplex OS2 Single Mode Adapters, 1U High 19″ Fiber Patch Panel offered by FS.COM is designed for OS2. The connectors are blue. This fiber patch panel uses 1.5mm SPCC material with black coating and can be mounted in a 19″ network rack.

single mode fiber patch panel

Product 48 Fibers, 24 Ports LC Duplex OM3/OM4 Multimode Adapters, 1U High 19″ Fiber Patch Panel serves as standard 1U 19″ rack, ODF and cabinets. The connectors are aqua used for connecting OM3 and OM4 with a design of 1.5mm SPCC.

multimode fiber patch panel

From the above, we know the two fiber patch panel share the same material, size and connector, but for connecting different fiber cables. So choose one just based on your own need. Remember, what suits you is the best.

Conclusion

The main effect of today’s electronic equipment comes from the ability of interconnection, and this can be simplified by using a single mode fiber patch panel or multimode fiber patch panel. Both of them can help technicians improve data center environment through making changes on the patching field instead of cable routing. FS.COM is an international supplier of high quality, cost-effective fiber patch panels.

Difference Between ODF and Patch Panel

At present, fiber optic connection is becoming more vital since it can transfer data among a large number of sources. In addition, due to the increasing demands of bandwidth and storage, the number of fiber optic cable of data center has surged than ever. With the continuous development of bandwidth requirements, technicians are relying on optical fibers that can support data transmission speed at 10Gbps or even higher. Here comes the problem, how to deal with the plenty of fiber optic cables? For many years, technicians have adopted ODF or patch panel as the means of cable management. The two methods are the highly reliable and easy ways that allow simultaneous high-speed communications among servers and data storage systems via fiber optic cabling. However, what’s the difference between them? This article will help you find the answer.

Overview of Patch Panel

Commonly, patch panel is installed in racks or enclosures to organize connections between a cable and an optical communication device. It can be used in fiber and copper cabling systems and serves as a terminal for cables that laid in vertical or horizontal direction. Patch panel works as a passive networking device that can bundle multiple ports together for connecting incoming and outgoing lines.

patch panel

Overview of ODF

ODF is short for optical distribution frame, which is an important part of building a safe and flexible environment for optical network. This equipment is widely used in optic communication room, fiber optic connecting devices and it can function as the protector of optical cable termination and line transmission.

ODF

Difference Between ODF and Patch panel

Though optic distribution frame and patch panel are both the ideal solutions for cable management, there are several differences lie in the aspects such as design, types and so on.

  • Design

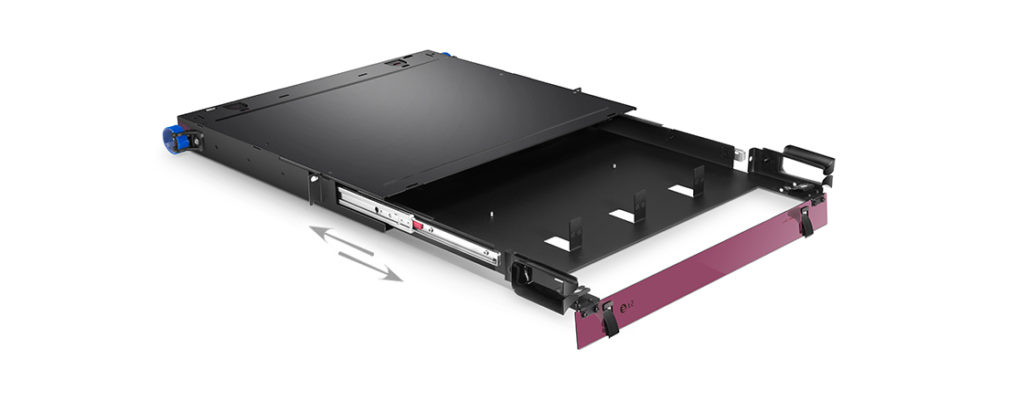
A typical patch panel contains four parts, enclosed chamber, adapter panels, connector adapters and splice tray. The product 1U Rack Mount HD Fiber Enclosure unloaded with a dimension of 1.73″×17.64″×18.41″ provided by FS.COM, is designed to accept up to 4 series MTP modular cassettes or fiber adapter panels within a 1U space. This product adopts the new design parallel sliding drawer, which can be pushed or pulled more stably as well as faster.

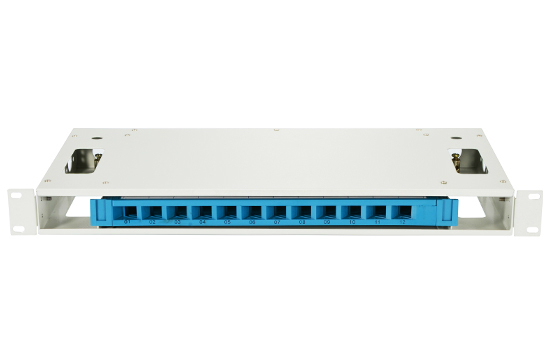
Optical distribution frame is a modular design with siding type trays. And it can be preloaded with different optical adapters and pigtails. The size of the indoor equipment could be very big or small just like patch panel boxes. FS.COM 19″ ODF with a dimension of 480mm×250mm×1U can offer a flexible cabling access, expandable frame design and comprehensive cable management.

  • Types

There are fiber and copper patch panel available. Copper patch panel is suitable for shielded and unshielded copper cables such as CAT5e, CAT6 and CAT7. In addition, due to different design, patch panel can be divided into rack mount and wall mount patch panel for different uses. FS.COM provide 12 ports, 24 ports and 48 ports of 1U high fiber patch panel.

ODF is usually divided into floor mount, rack mount and wall mount ODF for users’ different choices. FS.COM offers various types of optic distribution frames, such as 1U 12 fibers type, 2U 24 fibers type, 3U 48 fibers type and 6U 96 fibers type.

Conclusion

FS.COM offers many kinds of ODF and patch panels, and all are the cost-effective solution for your application. Due to the difference between them, you should choose one based on your actual demand.

How to Connect Fiber Optic Cable to Fiber Optic Patch Panel

Fiber optic cable is usually terminated in two ways. One is using connectors that pairing two cables to set up a link, and the other way is connecting the fibers to some network equipment such as fiber optic patch panel or switch for better cable management. No matter which terminations it uses, fiber optic cable should be installed in a manner with less signal loss. However, how to connect fiber optic cables to fiber optic patch panel correctly? Today, we will talk about the steps of this process. First, let’s have a overview of patch panel.

Types of Patch Panel

Patch panel is defined as the interface between multiple optical fibers and optical equipment. It’s a termination unit that helps networking and fiber distribution from wiring closet to various terminal equipment. Patch panel are divided into two types based on different designs, the wall mount and rack mount category. Both types can house, organize, and protect fiber optic cable and connectors.

Wall mount fiber patch panel is usually fixed on indoor walls with low-profile and compact design. It has a terrace that can provide a flexible cabling system. This patch panel is a suitable device for on-site installation of pre-connected cables and connectors.

Rack mount fiber patch panel is an indoor network equipment which is designed for standard 19 inch rack mounting. It’s available in 1U, 2U and 4U size due to different connection demands. This type can accommodate all kinds of fiber adapter ports like SC, LC, ST, FC and so on.

Structure of Fiber Optic Patch Panel

A typical fiber enclosure consists of four elements with different uses. They are enclosed chamber for installing adapter panels for holding, connector adapters for mating and splice tray for organizing. Thus, technicians can use a fiber optic patch panel to terminate fiber optic cables in a tidy and secure way. In addition, with assistance of a patch panel, they can also install, repair and upgrade networks quickly and efficiently.

Steps of Connecting Fiber Optic Cable to Fiber Optic Patch Panel

It’s important to make a right connection between cables and fiber optic patch panel so that the device can run well. Following the steps, you can do it.

  • A fiber optic patch panel should be prepared first and make sure this work will be done on a clean and level work surface. Patch panel is supplied empty, so the adapters should be inserted into the mounting plate. Then fix the mounting plate in position.
  • Prepare cables based on standard termination procedures and ensure there is enough surplus cable to work with. Connect the cable by fixing the gland and roll the excess fiber onto the spool. After that, remove the protection cap and insert into position in the adapter. Once the cables are all attached, it’s better to use a zip tie to secure the cables in a bundle.
  • Label each jack location on the fiber optic patch panel so as to distinguish the cables. Finally, mount the patch panel in a rack or cabinet.

optical fibers in patch panel

Conclusion

Fiber optic patch panel is a cost-effective way for cable management. Connecting fiber optic cable to patch panel is easy and can actually optimize the network work. So why not have a try?

Fiber Patch Panel Color Code

Data center is regarded as the heart of a company’s information, for the customer’s information, staff’s information and even the research information are stored here. When it gets into trouble, so does the business. Cable management is one of the issues that may affect the data center operation. While managing the cabling in data center, fiber patch panel color code is certainly included.

Overview of Color Code System

Color code is defined as a system that uses various kinds of colors to tell people something. The earliest application of color code is using flags for long distance communication such as flag semaphore communication. As our society and technology advanced, this method has been widely used in many fields, chemistry, telecommunication, and even the military. It became convenient to use different colors as signals for telling apart the confused or similar things. For example, the fiber cables in electronic installations. Color coding can help users easily distinguish whether the fiber optic cables is single mode cables or multimode ones.

However, different countries may use different color code standards. In Sweden, they introduced the S12 color code for micro cables and nano cables while Finland developed the color code called FIN2012. Fortunately, there is a global recognized standard named TIA/EIA-598 color codes.

Introduction of TIA/EIA-598 Color Codes Standard

The standard is developed by Telecommunications Industry Association.  It rules identification schemes for fiber optic cables, fiber units and other fiber equipment. Fiber optic cable is split into several strands. They are the single fibers in a large cabling. And in this way, there will be 24 individual strands. After the process, the strands are usually divided into 12 tubes. Each tube containing 12 strands is given a color. In telecommunication industry, all fibers should use recommended method based on the widely acknowledged standard for their individual details and unique color code.

patch panel color code fiber

Benefit of Using Color Code

Better cable management is the best benefit of fiber patch panel color code. In data center, there are always brunches of cables and facilities. When the configuration of network or cabling needs to be changed for introducing new or more devices, the technicians have to spend large amount of time to deal with the chaotic cables. But now, with the help of fiber patch panel color code, just at a glance, the technicians can easily and quickly tell apart which cable should be unplugged or connected. It’s not only a perfect way to increase efficiency for technology workers who are responsible for installing, troubleshooting and maintaining the network, but also an effective mean of saving staff’s time so that they may go home on time.

Conclusion

Fiber patch panel color code simplifies network management by providing a visual identification of every cable. This cost-effective and easy-to-use method can help users route cables in an easier and more accurate way, reducing network errors and making maintenance easier. FS.COM always remains focused on researching and developing ways for a better network.

Things You Need to Know About Patch Panel

Nowadays how to achieve efficient cable management is an essential aspect of network cable installation. Patch panel, as a crucial element of an interconnected network cabling, is able to realize the connection, allocation, and scheduling of cable links easily. This post will introduce some information about patch panel which can help you get a further understanding of them.

What Is a Patch Panel and How Does It Work?

Patch panels, also called jack fields and patch bays, are network parts held together within telecommunication closets that connect incoming and outgoing local area network (LAN) lines or other communication, electronic and electrical systems. If engineers want to set up a wired network which contains multiple wall ports in various rooms, patch panel can offer a simple, neat and easy-to-manage solution. There are various patch panels based on the number of ports like 12 Ports, 24 Ports, 48 Ports, etc.

patch panel

When patch panels are deployed in network systems, its major function is to bundle multiple network ports together to connect incoming and outgoing lines. For example, when patch panels become part of a LAN (local area network), they can link computers to outside lines. And those lines, in return, allow LANs to connect to wide area networks or other Internet. With patch panels, engineers just need to plug and unplug the corresponding patch cords to arrange circuits, which improve efficiency greatly.

The Importance of Patch Panel

As we all know, patch panels are typically attached to the network racks, mostly above or below the network switches. They consist of ports to quickly connect cables. Available in different sizes and configurations, patch panel can be customized to fit different network requirements. But all patch panels have a similar feature that they are important for networks to configure new equipment or phase out old components.

Patch panels from main links are to collect data and route it to where its destination. They are so critical to a system that if anything goes wrong with them, the entire system may fail. That means that patch panels are very important to the network system.

Furthermore, although there are no physical limits existing for a patch panels’ size, many of them have ports from 24 to 96. And for a larger network, hundreds of ports may be needed, which is another important factor—as the network grows, more ports mean the ability to accommodate ever-expanding demand.

Besides, patch panels also help electricians and network engineers by offering convenient, flexible routing options. Because a patch panel has numerous ports in close proximity, cables can be routed, labeled and monitored easily and efficiently.

Copper or Fiber Patch Panel?

There is no doubt that patch panels are extremely important in cabling systems. And they are one of the few components used in both copper and fiber cabling networks.

copper patch panel vs. fiber patch panel

The copper patch panel is typically made with 8-pin modular ports on one side and 110-insulation displacement connector blocks on the other side. Wires coming into the panel are terminated the insulation displacement connector. On the opposite side, the 8-pin modular connector plugs into the port which corresponds to the terminated wires. With the copper panel, each pair of wires has an independent port. And fiber patch panel needs two ports for a pair of wires, one for the transmitting end and another for the receiving end. Fiber panels tend to be faster to operate than copper ones. Of course, they are also more expensive.

Therefore, when it comes to the copper patch panel, each pair of wires has a port. While fiber patch panel requires two ports, but it is easier to be installed. What’s more, some professionals think there is no real difference in the performance and construction, while others have different opinions. They maintain that the fiber patch panels are better, even though they are more expensive than the copper counterpart. However, no matter what type of patch panels you choose, they must be based on practical situations.

Summary

As the growing demands for more effective cabling, patch panels also get more development. Manufacturers are now trying to produce more convenient patch panels such as front-access panels, which allow users to terminate and manage cables from the front. Getting a further understanding of patch panel can help you choose the suitable patch panel for your networks.

Take Cable Management Seriously

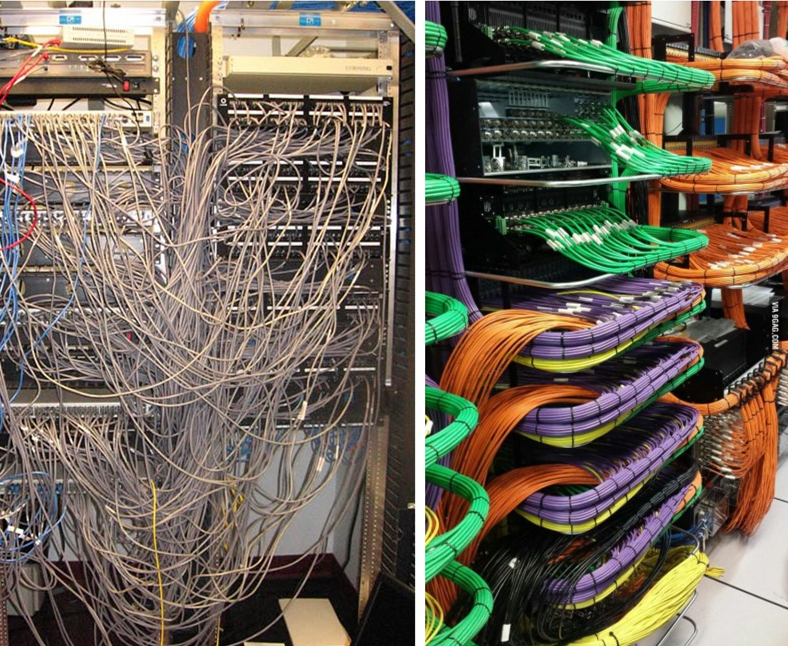
In a data center, it is common to see messy cables all over the place. Finding out the right cable becomes a nightmare. However, there are also good examples for well-organized cables that eliminate all the redundant operations due to cable mess. Typically, cable management is a solution used for the installation of equipment in order to secure cables for electrical services. An orderly data center will greatly enhance the working efficiency and ordinary people are more willing to work in a tidy environment. Therefore, cable management is very necessary for data center cabling.

cable management

Bad Cable Management and Good Cable Management

Benefits of Cable Management

With the help of cable management, there are many advantages that facilitate the work in data center:

1) Ease of Cable Connection

A good cable management can not only provide access to cables but also to devices they are connected to. If cables are tangled together, it will increase the difficulty for handling devices. And working hours are extended for a simple task. But if your cables are well-managed, the connection between cables and devices will be clear to see so as to finish work in a shorter time.

2) Avoid the Risk of Fire

If cables are not under maintenance for a long time, sparks will be easily caused in tangled cables. And the worst result will be a fire. In addition, when a person passes by the cable mess, he is more likely to be stumbled by the cables. Thus the risk of fire is also immensely increased. To avoid such situation, cable management takes an important role for fire safety.

3) Convenient Troubleshooting

While doing the routine troubleshooting in data center, cable testing is one of the steps. However, a huge amount of messy cables makes such a simple task into a complicated one and you have no idea how long it will take to finish the job. But thanks to cable management, you can easily maintain and change cables in order. The process is more convenient if cables are organized well.

Suggestions for Good Cable Management
1) Let in Airflow

Enough airflow will reduce the temperature of surroundings and components for lowering the risk of fire. But the tangled cables will block the air from flowing. Therefore, sorting out the cables to leave enough space for air flowing is very essential. Also, fans can be used as a way to create sufficient airflow to cool down the temperature more promptly.

2) Clean the Dust

A good cable management is always along with dust cleaning. If too much dust enters through the components, the efficiency of devices will be influenced. But the best part for a good cable management is that the open surfaces exposed to dust are greatly reduced, so the cleaning process is a lot easier.

3) Neat Appearance

First impression is always important for the judgment of a good cable management, thus keeping a nice appearance is necessary. The basic rule of managing cables is to make them in a neat order. Then a little imagination can be added to make the appearance more creative.

4) Use Proper Tools

Proper tools are needed for cable management because they can improve the efficiency of your work. Tools like cable wrap, screwdriver, wire scissors, pliers, cable ties, rubber band, etc. are recommended. These instruments makes the process more convenient and easier.

Conclusion

You may think of cable management as a tedious and time-consuming task. But as for the long-term benefit, it can prevent the device from damage and save time for routine maintenance. Thus better take it seriously to the best of your work in the data center.

Excellent Solution to Fiber Patch Cable Management

Recently I saw many people be in trouble in fiber patch cable management, usually see them stack the cables casually, many people will have the feeling of a mess and always envy other people can do it well, maybe today’s article can give you a lot of help and don’t have to be jealous of other people’s good work.

Fiber patch cords have the possibility to be the weakest link in the fiber optic network, usually in order the finish optimum performance and reliability we must observe true procedures in the administration of the fiber patch cords, the best solution will be the smallest cost and changes or moves. In the fiber patch cable management, the voice connection should be also careful. Well, let’s tell you detailed procedures.

patch cable management

When we receive the request from the administration, be sure that you know the introduction and design of the fiber cabling and you should also know that if you have fiber patch cords that can match to the stalled cabling, the reason is that fiber optic cables have different types and they should be distinguished. Then choose suitable length of fiber cable. The length depends on its points of connection. It is the shortest one that does not obstruct or interfere with other cords and connectors on the fiber patch panels, avoiding running cords and connectors on the panel. The next step is that tight the fiber patch cords, it will be pulled on connectors and too much slack complicates cable management, making the fiber patch panel more difficult to operate in. At the fiber patch panel, the patch cables equally toward both sides of the vertical cable management channels to prevent overloading one side. Be careful not to mix up cords of different core diameters. Additionally, cords must be of the same or higher bandwidth as the behind-the-wall cabling. Before the patching, there is a point we need to remember, it is cleaning the connector, the cleaning parts include connector ends on patch cords, connector ends on panels, connector ends on network equipment, as for how to clean different types of the fibre optic connector, such as fibre optic sc connector, fibre optic lc connector…We mentioned it in our Fiberstore’s blog, if you are interested in it, welcome to visit Fiberstore’s blog. For example, exceeding the bend radius can result in significant additional loss and adverse impact on channel performance. For example, mpo fiber cable, the minimum bend radius is ten times the core diameter. Take care not to use excessive force during the patching process. This can stress cords and connectors, reducing their performance. If you need to go to force in pulling a cord, something is wrong. If the existing core is the right length, it may be possible to re-use it. If this is the case, remove the cord completely and re-run it in through the cable pathways. This is the only guaranteed way to ensure there are no tangles, kinks or strains in the cord. The final step is to update the documentation of the as-built configuration and close the work order associated with the completed change request.

The above contents are the summary of fiber patch cable management steps, if there are some trouble when you are putting into the practice, welcome to discuss with us, and the related fiber optics that i mentioned in this page, such as various of fiber cables, fiber connectors, fiber adapters even fiber patch panels, you all can find from Fiberstore. Look forward to your coming.